To start using SANE, fetch the latest version of the distribution from the ftp directory:
If you want to build the graphical-user-interface programs that come with SANE, you will also need to fetch, build and install the GIMP or, at a minimum, the GTK distribution. Both GIMP and GTK are available at ftp://ftp.gimp.org/. GTK is the user-interface toolkit that originally has been developed for the GIMP, but is now being adopted by many other projects, including SANE. Note that the SANE distribution will build just fine without the GIMP/GTK libraries. However, that way none of the nice graphical-user-interface programs will be built, thus taking away much of the fun. So, unless you are building SANE for a server only, I recommend that you install at least GTK, if not GIMP.
After fetching the SANE distribution, unpack the compressed tar file and follow the instructions in the README file. The README explains how to build and install SANE. Also, take a look at the file called PROBLEMS; it contains a list of known problems and their work arounds.
Note that you don't have to own a scanner or a camera to play with SANE. The distribution includes a pseudo-driver that simulates a scanner by reading portable ``anymap'' (PNM) files. Also, SANE is not limited to Linux. Besides Linux for Alpha, x86 and m68k, it includes support for AIX, Digital Unix, FreeBSD, HP-UX, IRIX, NetBSD, SCO, Solaris, SunOS, and even OS/2.
After installing SANE, you should be able to type the command
and get the output shown below:scanimage --list-devices
As the listing shows, in this particular case, a Mustek scanner is available under name mustek:/dev/scanner and two fake devices called pnm:0 and pnm:1 are available that can be used to read PNM files. To get list of all options for a particular device, for example pnm:0, simply type:device `mustek:/dev/scanner' is a Mustek MFC-06000CZ flatbed scanner device `pnm:0' is a Noname PNM file reader virtual device device `pnm:1' is a Noname PNM file reader virtual device
This will produce the help message shown in Figure 1.scanimage --device pnm:0 --help
Usage: scanimage [OPTION]...

Start image acquisition on a scanner device and write PNM image data to
standard output.

-d, --device-name=DEVICE   use a given scanner device
-h, --help                 display this help message and exit
-L, --list-devices         show available scanner devices
-v, --verbose              give even more status messages
-V, --version              print version information

Options specific to device `pnm':
  Source Selection:
    --filename <\<>string> [/tmp/input.ppm]
        The filename of the image to be loaded.
  Image Enhancement:
    --brightness -100...100% [0]
        Controls the brightness of the acquired image.
    --contrast -100...100% [0]
        Controls the contrast of the acquired image.
    --grayify[=(yes|no)] [no]
        Load the image as grayscale.
    --three-pass[=(yes|no)] [no]
        Simulate a three-pass scanner by returning 3 separate frames.  For
        kicks, it returns green, then blue, then red.
    --hand-scanner[=(yes|no)] [no]
        Simulate a hand-scanner.  Hand-scanners often do not know the image
        height a priori.  Instead, they return a height of -1.  Setting this
        option allows one to test whether a front end can handle this
        correctly.
    --default-enhancements
        Set default values for enhancement controls (brightness & contrast).
The SANE package comes with a detailed man page that explains the specifics of the scanimage program. As an example, suppose we had a PPM file named input.ppm. We can use the scanimage program to ``scan'' that image and increase its brightness by 50% using the following command:
If you look at file output.ppm with an image viewer such as xv, you should be able to see that output.ppm is noticeably brighter.scanimage --device pnm --brightness 50 input.ppm > output.ppm
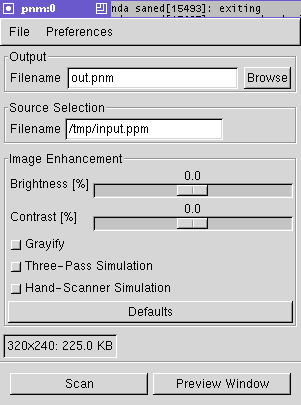
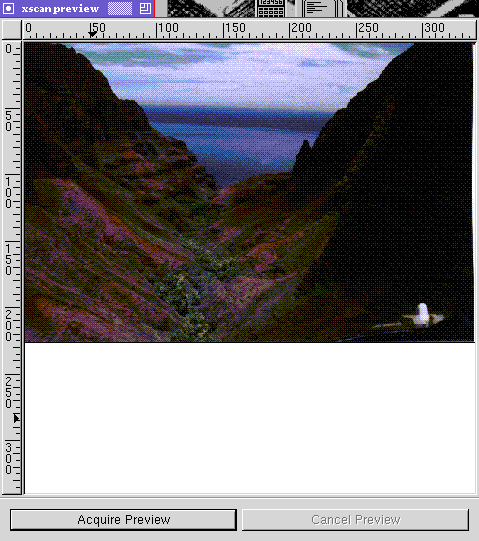
You may say: cool, but where is the graphical user-interface? Assuming you had the GTK libraries installed when SANE was built, you can invoke a program called xscanimage that will present you with a dialog box containing a list of available devices. If you double-click on the ``pnm:0'' entry, you'll get the dialog shown in Figure 2. As you can see, the dialog includes two text-entry boxes labeled ``Filename'' and a slider labelled ``Brightness''. If you enter output.ppm in the first text-entry box and input.ppm in the second box and move the brightness slider to 50.0, you can press the Scan button at the bottom left and get the same result as with the scanimage command line shown above. Of course, before doing the actual scanning, you could press the Preview button at the bottom right to pop up a preview window (see Figure 3). In the preview window, you can push the Acquire->Preview button to obtain a low-resolution preview of the final image. For example, by moving the brightness slider around, you can see how the brightness of the image is affected. After moving the slider, you'll need to press the Acquire Preview button to get an updated preview.
When scanning an image with a real scanner or camera, you'll usually want to enhance it in various ways, such as making it appear sharper. The nice thing about the xscanimage program is that it can also be run as a GIMP extension. To do this, simply create a symlink from the GIMP plug-ins directory to the xscanimage binary. Assuming the SANE installation defaults, you could do this with the following command:
ln -s /usr/local/bin/xscanimage ~/.gimp/plug-ins

After making this link, xscanimage will attach itself to the GIMP's ``Xtns'' menu the next time you start it. This makes it possible to invoke, for example, the PNM pseudo-device by selecting ``Xtns->Acquire Image->pnm:0''. When invoked in this manner, pressing the Scan button will put the newly scanned image inside a GIMP window (instead of saving it to disk). Now, the usual GIMP image-manipulation functions can be used to enhance the acquired image before saving it.
The PNM pseudo-device may be fun, but what does a real scanner interface look like? Figure 4 shows the xscanimage dialog as it appears for Mustek flatbed scanners. The figure also demonstrates another feature of xscanimage: tool tips (also known as ``balloon help''). Tool tips make it easier for new users to get acquainted with the capabilities of their scanner or camera. In the figure, the mouse points to the Scan Source menu and, as a result, the help information for that menu is shown in the yellow box below the mouse pointer. Tool tips are handy for new users, but after a while, they tend to get in your way. Thus, xscanimage allows advanced users to turn off the tool tips using the Preferences sub-menu.

As you can see, the Mustek dialog looks quite different from the PNM pseudo-device interface. This is because the underlying devices have different capabilities. In fact, the device dialog depends not only on the selected device, but also on the mode of the device. For example, when turning on the ``Use custom gamma table'' option near the bottom of the dialog, the interface changes, and the result is shown in Figure 5. As you can see, the right half of the dialog now contains a graph editor that allows the user to modify the intensity, red, green or blue gamma table. In other words, xscanimage displays precisely the options that are active or meaningful for a given scan mode, greatly reducing the likelihood of confusing the user.
Looking at the image-intensity gamma table in the right half of the figure, you can probably imagine that it would be rather annoying to define the gamma tables each time you started xscanimage. Once the ideal tables have been found, it would be nice if it were possible to save them. For this purpose, xscanimage allows saving the current device settings through an entry in the Preferences sub-menu. Once saved, whenever xscanimage is started, it automatically restores the last saved option values for that device.